Sunday, August 25, 2013

Try-A-Bike

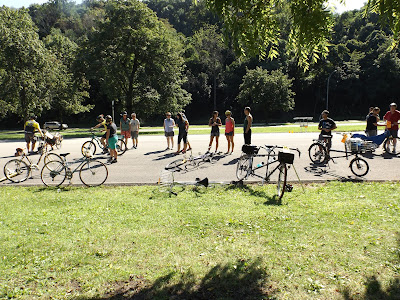
As bikefest 2013 was coming to an end I went to an event that I have been trying to get to since it was first started. Try-A-Bike. Set up at the Bud Harris cycling Oval it gives the general public a chance to try different types of bicycles. It also give cyclists a chance to try out different bikes and different styles of riding. Road Bikes, Folding Bikes, Recumbent Bikes, Unicycles, Electric Bikes, Tandem Bikes, and Mountain Bikes.

Thats a lot of bikes.

Here are some of the pictures I took

Here are some of the bikes that were brought by individuals in order for other people to try. Everything from a cool cruiser (in front) to a small folding bike (orange bike half way back) and a trike recumbent.


Here is one of the small folding bikes that can be ridden, then folded up and carried onto a bus or put in the trunk of your car. 

Here is another folding bicycle that is shown folded up. One of the bikes that was brought to the Try-A-Bike was a bicycle I dubbed "The Collar Boner" That being the bone you would most likely brake when try to ride it.

If you look carefully at the handelbars you will notice that there is a geared setup that turns the wheel in the opposite direction of the handlebars. I saw a couple people trying to ride it and I saw at least one of them fall. I saw none of the actually ride it. 

Colin set up a nice beginner moutain biking course and had several mountain bikes there for people to try their skills. 

The only bike I got to ride was the Surly Krampus a mountain bike with huge balloon tires and I have to admit I am quite smitten with it. It was just hands down fun. While I cant afford another 2 grand for a krampus I am wondering just how large of a set of tires I can fit on my Diamond back. I had a set of 2 1/2" tires on the bike and moved down to a set of more friendly 1.95's It may be time to go back to the bigger tires and take the Big Orange Bike on a little off roading.

if you want to you can take a look at the entire set of photos over at the Fatguy OrangeBike Facebook page.


Monday, August 19, 2013

The New Steed

I wanted to introduce everyone to the newest member of the Fatguy OrangeBike Family. Randy "The Macho Man. This is the one, the only,

The All City Macho Man Disc

This was a case of Love at first sight. I was at Thick Bikes when I came across a small postcard advertisement for this bike. I remember grabbing the card, dancing around and screaming "Please God tell me this is real!!"  Turns out it is. This is the newest version of their cross bike. Disc brakes, 20 gears, and a totally dream to ride.

Oh and did I mention it is Orange.

Really Orange

Orange and White

With White Pedals

And White Bottle Holder

So I ended up buying the Macho Man and by the time I made it three blocks away I was convinced that I had made the right decision. The only downside to the bike was the saddle, The horn of the saddle was just to long and tended to poke me in tender places. (I gave it a 100 miles and just could not get used to it.) I referred to the saddle as the "All City Fister" So I picked up a saddle with a shorter horn.

Not sure if I told you "Its Orange".

Sunday, August 11, 2013

Bike Suite Part 2

So here is the pretty much finished prototype. You have the two lights, the Dual Shift Registers in the center next to the Arduino Uno. The red breadboard holds the Ping Sensor which will detect an object to the left and behind at a 45 degree angle. There is also a series of warning lights and a button to switch between the different tail light animations.


Next will be getting it all boxed up and trying to get it mounted on BOB. Next will adding an accelerometer to detect braking. After I get that working I want to add some side facing lights. Made from the RGB rings that Adafruit offers.  I also picked up a strip of RGB Lights from Radio Shack that could also make a really cool light show. 

Let me know what you think.

Sunday, August 4, 2013

Bike Suite Part 1


A couple of weeks ago I wrote about the deaths and hit and runs that we have had here in Pittsburgh. I titled that article "A bit Upsetting" when the truth of the matter was that I found the whole thing very upsetting. I felt so helpless that people were being killed and people I knew and thought of as friends were ending up in the hospital. I had to do something, but the truth was I had no idea what to do.

Until I looked at my work area.

That is when the idea that has absorbed my mind for the last month. The idea of a set of electronics that I could build that would do two things. First it would increase the visibility of cyclist to the motorist. Second it would help the cyclist be informed of the surroundings. (I am thinking here of cars to the rear and left of the cyclist.) So I have thought long and hard about this, waking up in the middle of the night and finding it hard to fall back asleep as my mind pondered over some little detail.

Losing sleep makes me crabby.

So what follows may be a little geeky for some of my Cycling friends but I am hoping that you can help me see the things I am missing.  First lets start off with a general description of what this Bike Suite will do.

Description
The bike suite will accomplish several goals.

Object Detection Mode
1. Detect Cars that are closer than the 4 feet (1.22 meters) allowed by PA Law.
2. Detect Cars before they are beside the bike. at 45 degrees behind bike
     (i.e give cyclist time to react)
3. Flash lights to alert Motorist that they are too close.
4. Warn cyclist with lights that object (Car) is to left rear.
5. Warn cyclist with buzzer when object is within 30 inches (0.76 meter)

Brake Detection Mode
1. Detect when bike is slowing down
2. Flash taillights to warn people behind (motorists and cyclists) that bike is slowing down.

Standard Rear Light Mode
1. flash rear lights as standard rear lights

Hacked Tail Lights
I started with the cheapest tail lights I could find at my local bike shop. I then opened them up and I hoped that I could use the hardware inside the tail light but that wasn't meant to be. So I tore out all the innards and whipped up the new hacked innards.


I plan on using hot glue to seal up where the wire goes, and locate the board inside the two tail lights.
These lights will be the main way to communicate to the motorist. Below is a video of the hacked lights blinking. Try not to be distracted by the sound in the background


This should give all of you some idea what I am working on.

Controller

The whole thing is being controlled by an Arduino Uno (Microcontroller), but the final prototype will be with a much smaller Arduino Micro. Check out the following photo for an idea of scale. The larger one is the Uno.


The idea is to use an Ultrasonic sensor to detect an object behind the bike at 45 Degrees. When something is detected and it is closer than 4 feet the left tail light will flash like it is shown in the video above. A light on the module attached to the handle bars will also flash, thus alerting the motorist and the cyclist. See photo of Ultra-sonic distance sensor below.


Braking

Brake detection is accomplished by the use of an accelerometer.  This will detect if the bicycle is speeding up or slowing down. If it detects the bike is slowing down it will flash both tail lights solid. Right now I am in the process of determining how much of a change in acceleration will cause the brake lights to turn on.

At the moment I am trying to build all the modules and get the code working to allow it all to work together. I will keep you informed of my process here. Also when it is finished I will make detailed photos, schematics, and the computer code available as part of the Open Hardware Repository and Creative Commons Projects. Meaning that anyone who wants to can build a system of their own.

If you have any ideas of options or actions that could be added to the Bike Safety Suite please leave them in the comments.